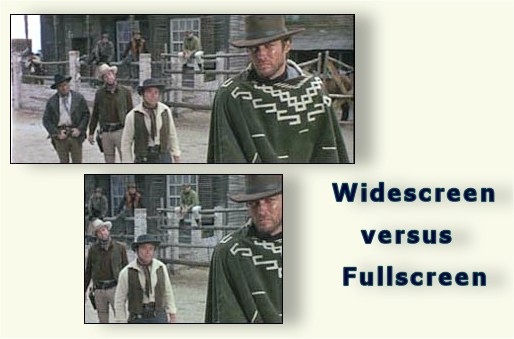
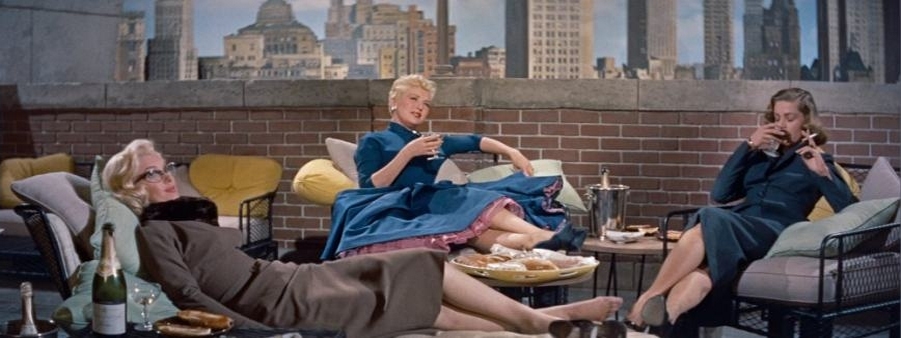
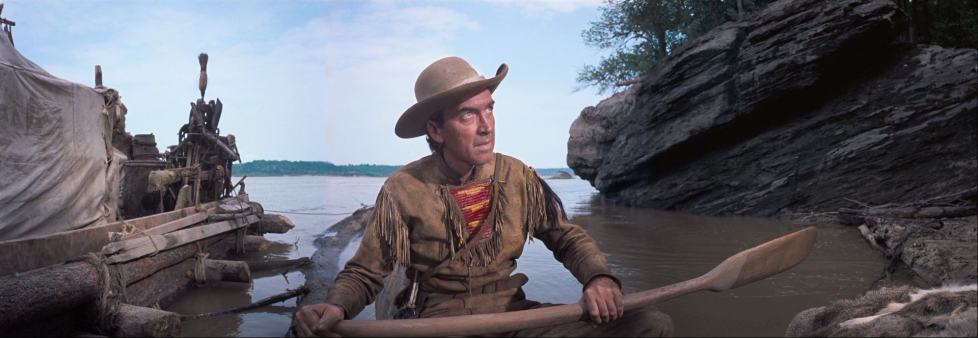
- Height / Width, given as a decimal number, like 1.778.
- Width : Height with a colon, given as whole numbers, like 16:9.
There are two ways to describe a video's Aspect Ratio.
These two examples are actually the same aspect ratio. 16/9 = 1.778. If a video plays back with the wrong Aspect Ratio, it will look stretched or squashed.
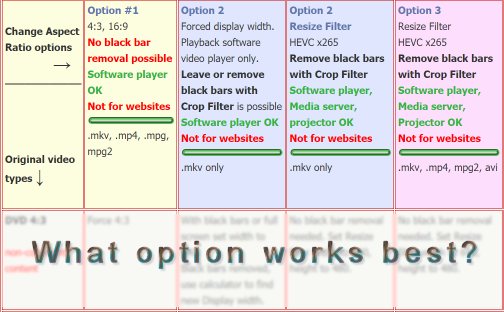
Option #1, below, can create a video from a DVD or VHS tape in the correct format.
Option #2 can remove any black bars and fix video playback.
Option #3 can also remove black bars and make a video, that can play back on web pages using HTML5, which is very particular about what it likes to play. Use option #3 if you want to create videos for a Media Server, which converts always to the AVC H.264 video codec before it plays back anything. You can keep your media server from overheating by saving videos in AVC H.264 codec, in the first place.
TV and movies can be shot in different Aspect Ratios. DVD's or VHS tapes of movies, documentaries and TV shows have an additional problem, that the video is always squashed, because the playback is suppose to be the old standard TV, which takes the squashed video and makes it look right again.
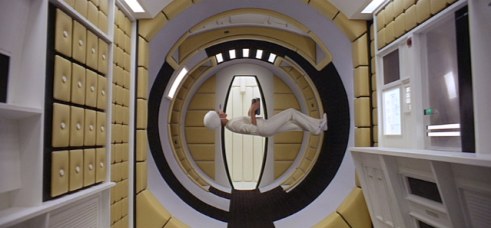
Director: Stanley Kukrick - Pixel Aspect Ratio 2.20
Tip: You can find out the exact video height and format in AVIDemux video information [Alt Return] or in top menu - File | Information.
What options work for which video type?
And why the heck is this so complicated? I am sorry about that. It's caused by having many different video types and ways to play them back. You can use a computer, phone, tablet, TV, media server, play from your own website, upload to a website, cast from a computer, playback with a projector and a few more. Each method is picky about what it can play.
Computer and phone video players handle most anything. New widescreen TV's automatically fix old DVD and VHS format problems. Playback on your own website is very tricky. There are three options and some variations to make a video copy with AVIDemux software. Find the original video type on the left column and where you want to play it back in the top column, to see which option works best. These options only work for
These steps, alone, do NOT work for copying movies or TV shows from DVD's. I show movie examples of aspect ratio, just because they are fun to see. if you have a question about what step might be missing.
Encoding videos is a profession and comically complex. You really only want to continue, if you find this fun... Don't say I didn't warn you.
- 4:3 (1.333) is very useful. DVD and VCR videos will be 10% squashed. Force 4:3 will fix this.
- 16:9 (1.778) use for videos that originally were 16:9 from an HD source. Any top and bottom black bars will NOT be removed. Weddings and other event videos should look correct, with no black bars.
- 18:9 (2:1) is the ratio for some taller phones. Forcing an 18:9 can fix a squashed video from a phone.
- 64:27 (2.37) does not match anything. It's midway between two movie aspect ratios. So, if you use this ratio for widescreen movies, both conversions will be wrong; 2.35 movies with be stretched and 2.39 movies will be squashed. I assume this value is available because most people cannot see the difference.
- For original movies made in film, check to see if there is 3:2 pulldown. It's possible to resample (remux) and shift the frame rate back to the original film speed. Be careful. Newer DVD's don't have this problem and no frame rate change is needed.
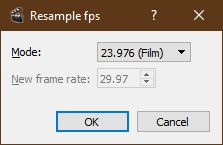
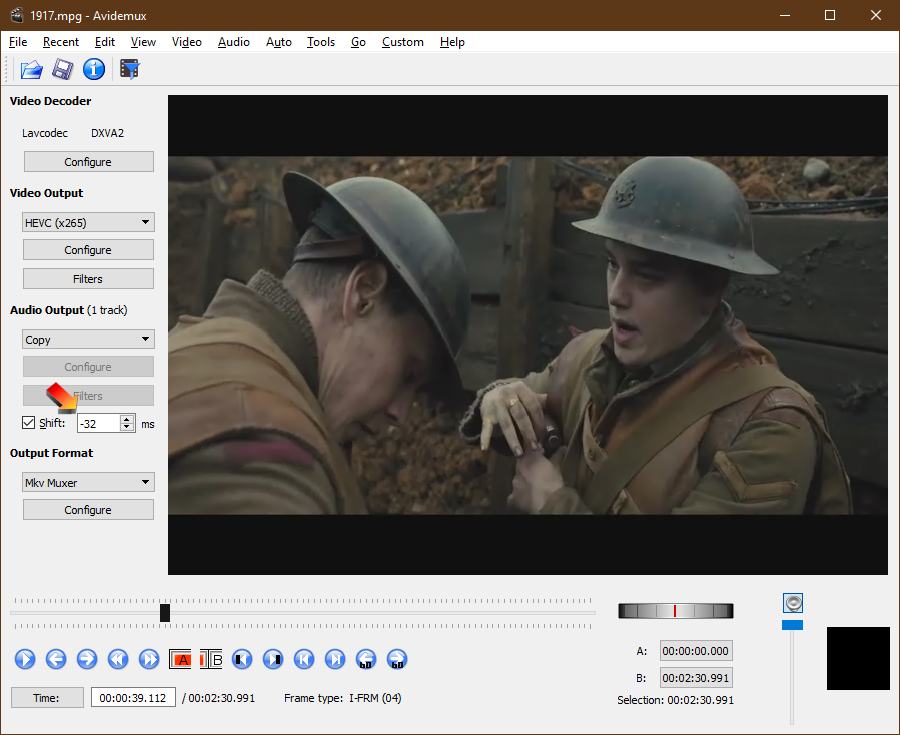
Video Output | Filters | Resample FPS | Mode: 23.976 (Film) - Combined with: Audio Output | Shift (checked)
Converting to film mode 23.976 can take away 3:2 pulldown that may have been added to a movie. Most, top end, DVD commercial releases have already removed any 3:2 pulldown and does not need to use a filter to resample the frame rate down to 23.976 fps. Only some older, pre-2000 DVD's or perhaps a DVD created from original 16mm or 35mm film may have this 3:2 pulldown issue. You can check by opening the DVD video in a player and move forward a frame at a time. If it has 3:2 pulldown you will see 4 motion frames, followed by a duplicate frame that doesn't move. Check this before using a AVIDemux filter to change the frame rate.
Now, the DVD playback rate is 29.97 fps. OK, What!? Why are we dealing with these crazy numbers? Here is why 29.97 exists? There is a clever, but complex reason: Why is TV 29.97 frames per second?
How does 29.97 convert down to 23.976 (very close to the original 24 fps of film)? Well, 29.97 has 4 frames of moving motion, followed by a 5th frame, duplicating the 4th frame. We, as humans, cannot see this, easily. It's called 3:2 pulldown. So, converting from 29.97, you do this:
29.97 / 5 * 4 = 23.976
Converting to 23.976 pulls out the duplicate 4th frame. For example, before you had frames:
1,2,3,4,4,5,6,7,8,8...
After conversion to 23.976 fps you have...
1,2,3,4,5,6,7,8,9,10... So much smoother.
Your video player reads the video file playback speed and shows the video at 23.976 fps. The speed will look the exact same as the DVD. Aren't you glad you asked?
Do you notice a potential 'gotcha' here? If you try to edit the video before removing the 3:2 pulldown? Aha! It is extremely easy to get out of cadence when you make an edit and the series of 3:2 no longer continues. So, if you then remove the 3:2 it will be correct for a while, then off, then maybe correct again. It's a mess.
On top of this, if you try to edit mpeg compressed video with I frames (complete video frame image) followed by B frames, which are only info of how the image changes, it's easy to cut into the middle of a frame sequence and get a lot of pixel artifacts flipping around the screen for several seconds... not very professional. Obviously, editing is best done on a master that has no 3:2 pulldown and no mpeg compression frames. The master has a complete image for every single frame and no frames are repeated. It's very time consuming to get a master copy out of a mpeg compressed video and usually no one every does this. The quality would be less than an original master, anyway. This is why production studios work only with master versions, which are extremely large files. A single movie would take, perhaps, over a hundred DVD's. It's usually delivered on a tape or hard drive. It could also be the original film negative.
Since 2001, films have also been shot at 30fps, 48fps or even 60 fps and frame rate is converted down to 29.97 fps for DVD release. The only time to use this resample filter is when the original movie was shot with film stock at 24 fps and the DVD was not upconverted with blended frames, so you actually see the 3:2 pulldown frames. To test this, simply open the video and step through one frame at a time. Most DVD producers have already blended the frames and you will not see 3 frames moving and then 2 frames not moving. So, if every frame moves, then there is no 3:2 pulldown to remove. Just leave the frame rate at 29.97 fps.
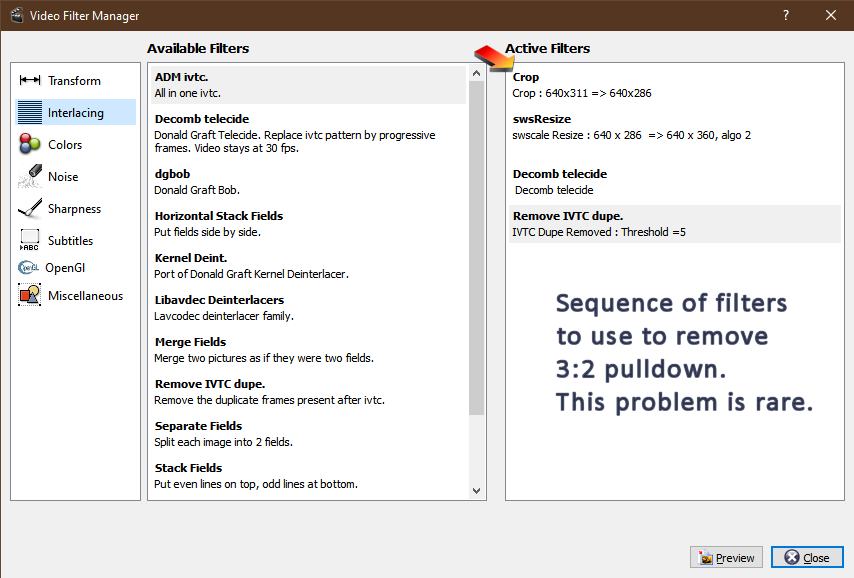
Very old DVD's or independent productions, shot with film 24 fps might have 3:2 pulldown on a DVD or on a video file. AVIDemux has filters to pull this out. The filter order would be:- Transform | Crop (if needed)
- Transform | swsResize (to fix incorrect aspect ratio)
- Interlacing | Decomb telecide
- Interlacing | Remove IVTC dupe
- Audio Sync? This is not usually a problem, if you did not change the frames per second. If you have changed the frame rate from 29.97 down to 23.976, you may wish to check the audio sync. Shifting audio back -42 or -84 milliseconds, helps sync issues. Every 42ms is one film frame when the frame rate is 24 or every 40 ms when the frame rate is 25 fps (PAL Europe).
This is really tough to do, but it seems to be a problem on every DVD conversion. Sometimes a film will have dubbed lines which means the lip-sync for those scenes is not prefect from the start. You can try different audio timing adjustments. The filter playback may not be 100% accurate for audio. Try setting the start and end edit sliders on a 10 - 20 seconds of video with a close up faces where you can see the actors lips speaking with some B's and P's. Save to files with different audio shift rates in steps of -42ms and just name each filetest-0.mp4 (no change frame),test-42.mp4 (1 frame),test-84.mp4 ... (2 frames),test-126.mp4 ... (3 frames).
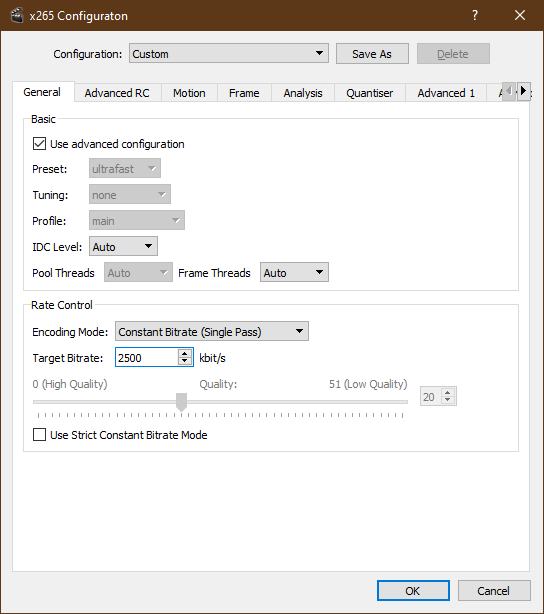
It's very difficult to see because each 42ms is only one frame or 1/24th of a second. If you do 4 tests, you may find one audio shift that seems natural and synced. I usually find this perfect sync at -84ms or -126ms, which is moving the audio, back 2 or 3 frames... negative direction makes you hear it sooner. If you see the lips before you hear it, you need to pull the audio further back to a more minus value. If you hear it before the lips make the P's and B's, then you need to add ms to bring the audio up to the video. Normally, the adjustment is always minus ms when coming from DVD's. Getting this right is an art. Skipping this altogether is probably fine. Most people will never notice a 2 or 3 frame sync problem. - Quality Settings: General Tab | Rate Control / Constant Bitrate (Single Pass) / Target Bitrate - between 2200 for drama and 3200 kbps for extreme action for DVD resolution videos. DVD video rates are around 6000 kbps or 6Mbps and sometimes encoded with a variable bit rate for long films. Special versions of DVD releases might get higher bitrates. 1500 kbps and 192 kpbs audio is the standard for online movies.
I find that I can see some artifacts in blurring of skin detail, when an actor moves and only encoding at least 2400 to 2500 kpbs will give the actor a 3D look, separating them from the background and have fairly good skin detail, when they move. I also prefer to never set the audio at 192, because all sibilants sound hissy, distorted and all depth of separation of music, sound effects and dialogue is flat at 192. I prefer 640 kpbs audio for online video H.264 use.
If you are using HEVC H.265 encoding, then just copy the original audio or change it to PCM stereo. HEVC will not easily playback on a media server and will not playback online. So, the only way to use it is to play it back on a software video player, which can handle the direct copy of audio from a DVD. I was trained to be a sound engineer and I notice sound detail that many people may not hear. I can post example videos clips of one scene for different bitrates. If anyone is interested, send me an email.
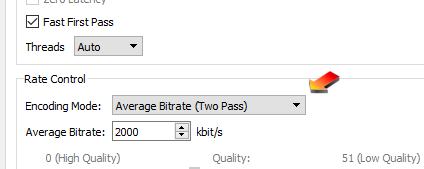
Another setting is Average Bitrate (Two Pass). This works well with slower moving dramas and can make files sizes smaller. This is used for all online and cable network movies usually set around 1500 bitrate. The first pass is used to spot heavy action scenes and then the bitrate is moved up, to encode those scenes on the second pass. Setting at 1500 works fine for slower moving films. If you want a little better resolution and less blocky artifacts in dark areas and less fringing around titles and sharp edges, then use 1800 bitrate. 2200 should handle most action films. You might still notice artifacts at the beginning of fast chase scenes and in camera pans. Setting at 2500 should really provide excellent quality with two pass.
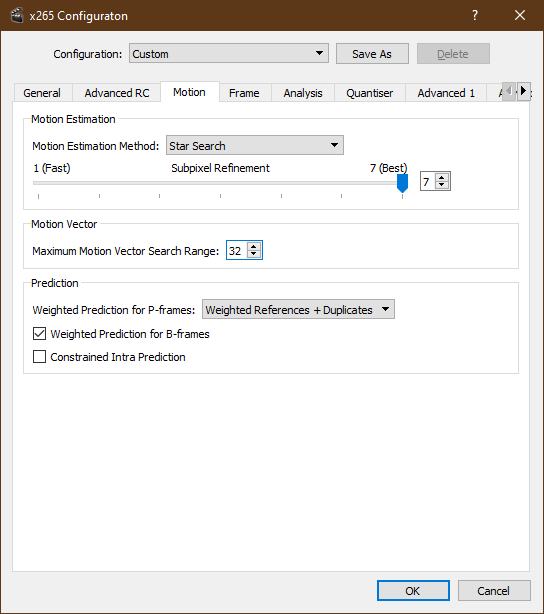
- Motion Tab | Hexagonal, Uneven Multi-Hexagonal, or Star Search & 7 Best
- Motion Tab | Motion Vector 16 for most videos, 32 for very fast action films. This setting scans around to spot any motion happening x number of pixels away and create a new I-frame reference image. Fast cars, heavy action or explosings might look better with less distortion with a 32 setting. Most video editors are happy letting this stay at 16. 32 really only helps action that goes from one edge of the video to another in less than 1.5 seconds.
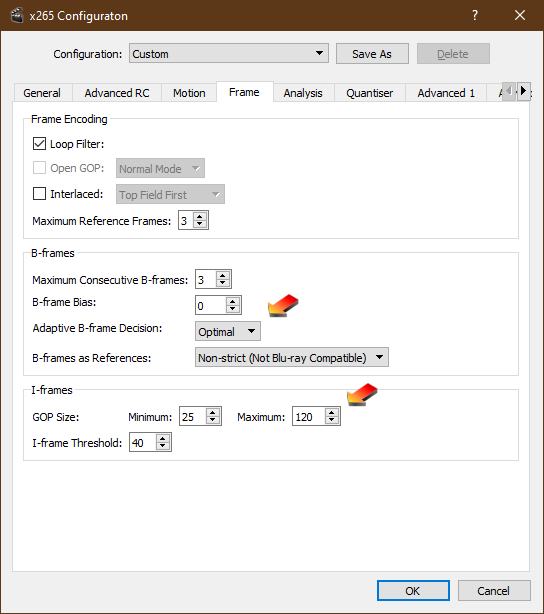
- Frame Tab | B-frames | Adaptive B-frame Decision - Optimal. This setting makes the encoding take a little longer and scans ahead in the video to make sure that any quick pans and motion appears with less distortion.
- Frame Tab | I-frames - Maximum 120. This sets a new reference full image to happen at least ever 4 seconds. The default is 8 to 10 seconds (250) which really only happens with calm scenes of people talking and no camera movement. If the video is a drama and like this, then leaving it at 250 will work and make the file smaller.
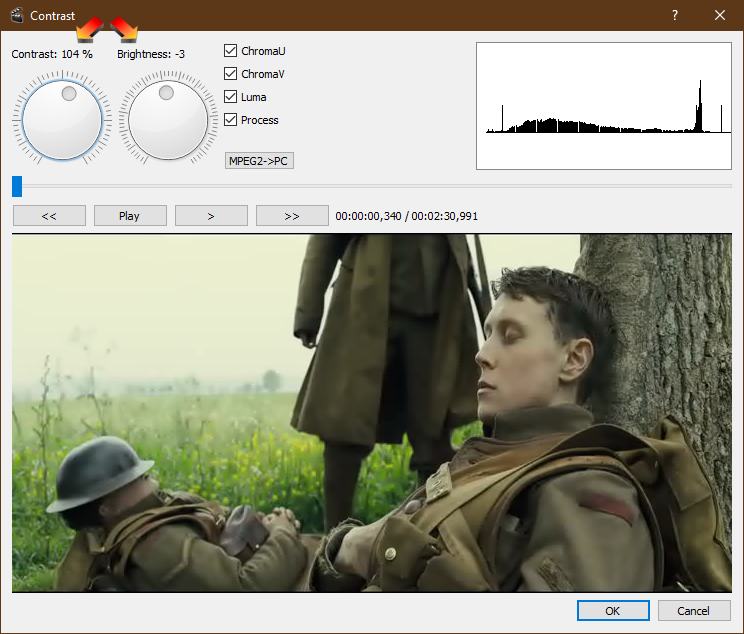
- Filters | Colors | Contrast | Click the [MPEG2->PC] button and tweak the values back toward contrast 100% and and brighness 0, somewhat. Usually, a contrast of 104% and brightness of -3 looks good on content that is a little washed out. DVD and VHS are sometimes contrast tweaked for old standard TV's. Computer monitors can handle a wider contrast range. Check bright and dark scenes to find the best middle setting for contrast and brightness.
The graph on the left of the Contrast filter control is helpful and shows when the blacks are all the way to the left and whites all the way to the right. The trick is to not let any of the black vertical lines go past the edges. Width is controlled by Contrast and position is controlled by Brightness. The final test is really if the scene visually does not have washed out whites or lost dark areas. - Filters | Colors | Mplayer eq2 - Sometimes video content and even an entire movie on DVD is too red or yellow. Blue skies and green bouncing off grass can tint flesh tones. Wedding videographers often tweak the color balance reddish, so all blue green flesh tones go away. Cinematogaphers know this issue and use colored reflectors and 100 square foot overhead scrim filters to warm up colors on actors. Sometimes DVD producers will just make the entire video a little reddish or yellow to solve actors from looking too blue. These false colors pop-up on low budget DVD -
B-films. ProperA-list films are color balanced for every scene.
Fixing a color cast with AVIDemux filter on a single encoding pass does the entire movie, at once. The color correction tools in this filter are basic and not meant to fix every scene. Be sure to calibrated your computer monitor for color before you try to do any color balancing. I find, I use it a lot, just to get the color balance back to where I like it.
There are three color filter sliders, Red, Green and Blue in the upper right. You usually just need to adjust two, because any two in one direction is the same as adjusting the third slider in the other direction. Ajdusting a 3rd slider is only valid if you move it to either 99 or 101 because that is half way bewtween adjustment done by moving the other two sliders. Moving settings from 100 to 101 on Green and Blue is the same as 98 on Red. Moving to the left on these sliders, shift to Cyan, Magenta and Yellow.
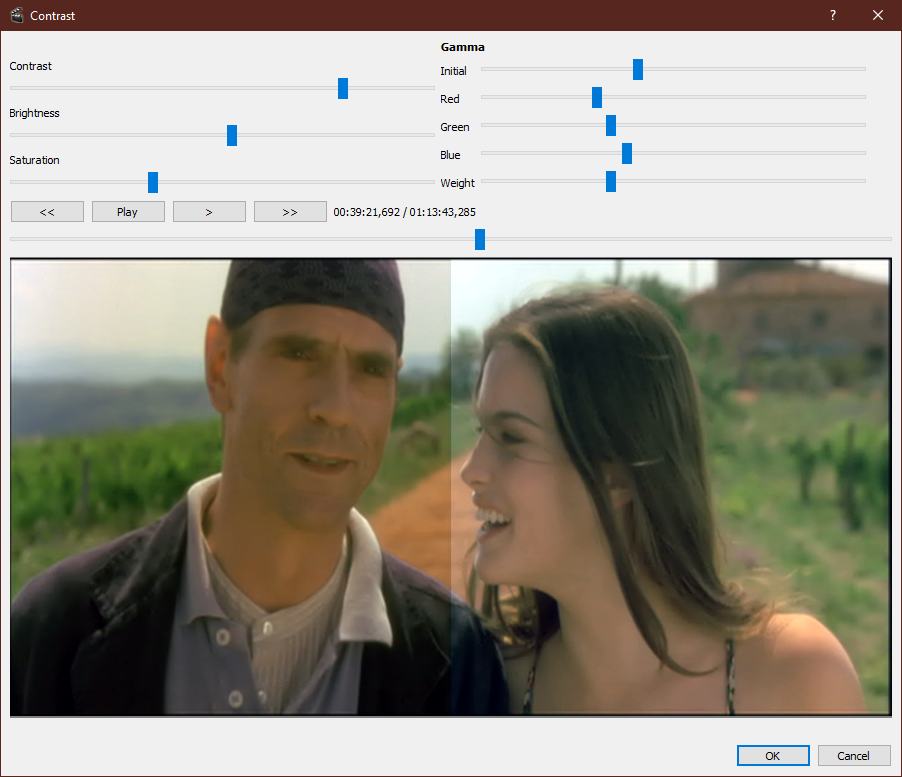 It's good to look for daylight scenes to adjust colors. A blue sky will make neutral grey stones 30 feet in the background and pavement a little blue and distant mountains more blue. If actors sit on green grass, it will reflect into their skin and hair. Early morning is more blue with some pink and later afternoon can be more yellow and orange. Another excellent test is getting hair color to look right without a red, magenta or yellow color cast.
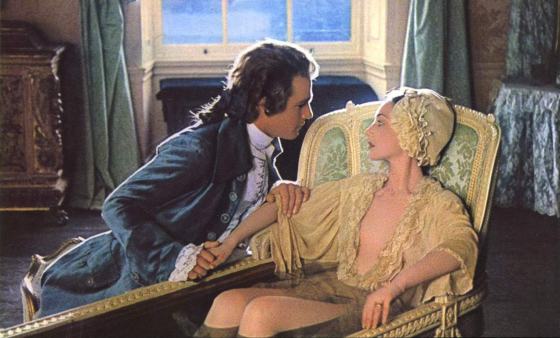
In the example image from Stealing Beauty (1996) - aspect ratio 2.35,Liv Tyler's hair on her left shoulder actually has a little bit of green reflection of the orchard, while the top of her hair looks like a real brunette and her skin color looks real. The original color is on the left side, with Jeremy Irons.
This filter also has contrast and brightness. Be careful not to lose detail in the shadows. After you make any setting change, scroll to a dark and light scene to make sure you can still see both shadows and highlights. There is also a color saturation slider on the left that can bring back faded colors from old film movies shot in the 60's or earlier. If used, just 101 or 102 is usually enough.
The AVIDemux color filter has been upgraded and looks a little different now. There is no more split frame. There is a button to see the original color for the whole picture. - Mpeg4 AVC H.264 (Advanced Video Codec) (2003) .mp4 videos
AVIDemux calls this MP4v2.
H.264 video, AAC (FDK) audio and using the Resize filter set to the correct aspect ratio is the only combination that plays back easily for all browsers and is the preferred upload video type for Youtube and Vimeo.
x264 is an open source encoder developed by VideoLan for encoding video streams into H.264 and is used by AVIDemux software to make .mp4 videos. - HEVC H.265 (High Efficiency Video Coding) (2013) .mkv videos
AVIDEmux calls this HEVC x.265.
HEVC H.265 videos cannot playback online with most browsers and is not recommended for Media server use. These video types are created using options 1, 2, above and steps 7 and 8 below inoption 3.
These videos can look great and could be used for direct playback on a home network to a computer, phone or tablet using FTP to copy the file or VLC player to play from a shared FTP directory. This would be a click on a thumbnail and file name to start playing with no other Media server type features. It's possible to get a TV to play from a FTP server on your home network, but is a little tricky. Most people would prefer to have an in-house, Media server, which runs better with the Mpeg4 AVC H.264 videos.
This is used for 4K playback but can also be used for any video size. There is a complete review, comparison and preferred settings, just above in the option 2 section. x265 is an open source encoder developed by VideoLan, is used by AVIDemux to make .mkv videos. - Webm Video container with:
VP8 (2008)
VP9 (2013 - used by Youtube for HD and 4K)
AV1 (2016 - used by Netflix, supported by Firefox)
These videos types playback with modern browsers but many older computers strain to play them, without hardware acceleration. (Webm AV9 test page).
Pros and Cons:- Webm VP8, VP9 or AV1 video content can be played by most browsers.
- AVIDemux does not do VP8, VP9 or AV1 encoding. (AV number 1, not AVI).
- Webm VP9 or Webm AV1 videos can be added into your own webpage and are worth considering, if you are plan to offer HD or 4K on your site.
- Embedded Youtube does not allow HD or 4K playback. Youtube requires you go to their site to see HD and 4K videos.
- To make Webm VP8, VP9, AV1 combination, you would need to use another encoder, like ffmpeg or AV1 Dav1d. These encoders require a very high end and fast computer to work well.
- Subscription, cloud based, services: Akamai, Visionular can stream HD and 4K videos in Webm AV1 and let you embed the videos on your own website. This is useful if you expect high traffic, audience from around the country or the world and have more than, perhaps, 50 videos.
- Playback on older computers will be CPU instensive and not ideal. Youtube solves this by automatically suggesting lower resolutions 720, 480. The user has to force a video selection of 1080 or 4K.
- You need to upload a 4K master (MP4 H.264 with AAC (FDK) audio) to Youtube to trigger the VP9 conversion. (Option 3, steps 1 - 6 below.)
- Many people, with slower computers and bandwidth install a popular plug-in like h264ify to force Youtube to only play back the older AVC H.264 video files and never use the VP9.
- Some Media Servers prefer the older AVC H.264 and may not easily support Webm videos. This is important to figure out, before you start collecting videos for a home media server.
- VLC, a third party, video player can easily play back all these video formats where an Internet browser takes more CPU use to play back the same videos.
- Full screen online background website videos typically are only 720 or 960 in pixel width, MP4 H.264 or Webm VP9. It is rare to find 1080 to 4K video on websites, unless they are featured video examples in embedded players.
- Webm VP8, VP9 or AV1 videos cannot be created with the current AVIDemux software and there is no setting for this video type in any option on this page.
- VVC H.266 (Versatile Video Coding)
- Available but in limited use.
- Will be useful for 4K, 8K and 360 degree video.
- This video type cannot be created with the current AVIDemux software and there is no setting for it in any option on this page.
- Mpeg4 AVC (x264) (the only video type that works)
- AAC (FDK) (only audio that works for HTML5 web playback)
- Any other audio codec or Copy (playback is fine for VLC or other, stand alone players but will not playback on your own website using HTML5)
- AVI (works with warning)
- MP4v2 (the only type that works for HTML5 web site playback)
- Mkv (use the easier option #2, above)
- Mpeg TS muxer (ff)
- Video Only
- Video Output: Mpeg4 AVC (x264).
(The newer HEVC (x265) looks like it will work in Output 1 (steps 7 and 8 below), but it doesn't. Encoding to HEVC (x265) works in option #2, Force Display Width or with the Resize Filter, Step #6 below. HEVC (x265) will not play back on your own website, using an HTML5 player. For that, you must use AVC (x264) instead.) - Audio Output: Only AAC (FDK) will work for HTML5 playback on a webpage. For other use, all audio formats will work. Youtube will accept other audio formats but has stated it prefers AAC (FDK).
The Audio Configure button will open a window that allows you to pick the encoding bitrate of the audio. I suggest 320 kbps or higher, all the way up to 640 kbps. (Audio quality on a DVD release are usually around 640 kbps, except for some rare DVD's that list PCM audio stereo which would be at 1500 kbps. - Output Format - Muxer: pick any of the 5 video types above. (Only MP4v2 works for HTML5 website playback and is the one preferred by Youtube.)
- Video Output [Filters] button | Crop: Make a note of the new video height.
- Optional settings:
For original movies, you can use the Resample FPS filter set to movie 23.98 fps. This removes extra frames that were added to the movie to make it playback on a standard TV. This is called removing the 3:2 pulldown or Reverse Telecine. It fixes jagged lines and makes the video look much more like a movie.
Output Format | Configure | Optimize for Streaming: This fixes output stream timestamps and keeps smooth video playback. It's especially good for surround audio.
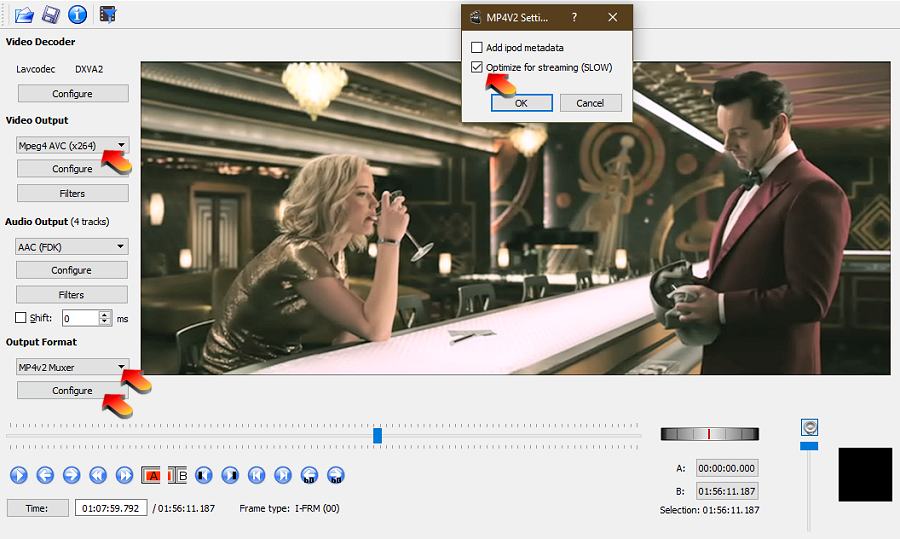
Sony Pictures - Passengers (2016) - Video Output [Filters] button: sysResize:
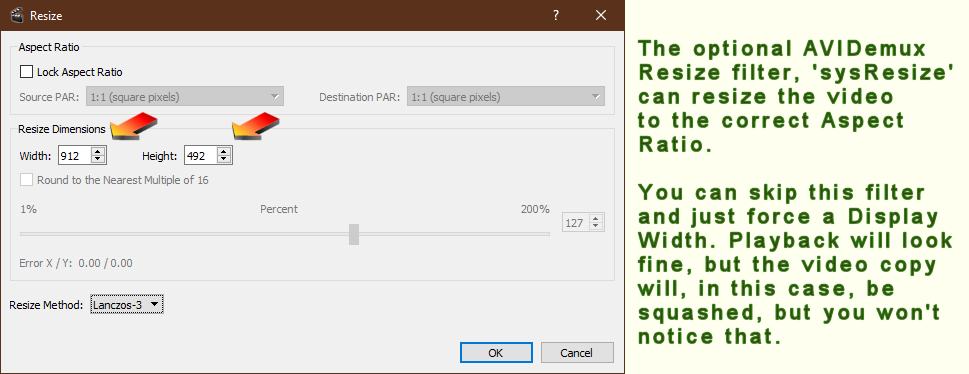
Once you do step 6 and use the Resize filter, you are done. You can skip steps 7 and 8, below. This step is required to make videos that can playback on a website with HTML5 player or for making videos to play on a Media server.
If you skip step 6 and do steps 7 and 8, instead, you will make videos that playback fine with software video players but will not playback correctly with HTML5 players inside a web page. The breakdown of which option works for what, is also stated in the
Change Apsect Ratio options chart, mentioned above.
The Resize filter works with the newer HEVC x265 video codec and all other Video Output types.
Resize Filter Settings:- Aspect Ratio | Lock Aspect Ratio - unchecked
- Resize Method Lanczos-3
- Make the video into the correct Pixel Aspect Ratio
Either use the Width Resize Calculator, above, or use the calculator below.
Height is rounded to the closest even number, which is required by the encoder. So, sometimes the aspect ratio is precise and sometimes the video will still look very slightly stretched or squashed. Check for accuracy in the
Black bar player demo / Width Resize Calculator above.
If you watch movies on a small screen, you will notice less height discrepancies. Most people don't notice if the video stretched or squashed under 5 pixels. Some settings will give accuracy under 1 pixel. These perfect matches make the Full Screen Playback Test box change to deep green. Try changing 720 width to 752 in the starting example, below. Notice how the height, auto updates.
Height Resize Calculator
The calculator lets you input an odd number for video width, but converting software will use the next higher, even number. Enter an even numbered video width, to get accurate results.
<--- Change width and Aspect Ratio
to find a new Display height.W = Current video width:
R = Target Pixel Aspect Ratio:
_______________________________________H = Display height:
W/R This will always be an even number.
###
Full Screen Playback Test # pixel off
1600 x 1200
Width is not ideal
Height is not ideal
 Some near perfect values
Use widths:
-
640+ for VHS
720+ for DVD
1920+ for blu-ray
-
1080P: widths 1920 to < 2048
720P: widths 1280 to < 1920
480P: widths 854 to < 1280
-
WidthAspect RatioHeight
-
640 1.333 480
704 1.37 514
640 1.778 360
640 1.85 346
640 2.35 272
672 2.35 286
720 1.333 540
768 1.333 576
800 1.37 584
896 1.37 654
768 1.778 432
896 1.778 504
944 1.85 510
1184 1.85 640
752 2.35 320
864 2.35 368
736 2.39 308
784 2.39 328
880 2.39 368
1152 2.39 482
1440 1.333 1080
1600 1.333 1200
1920 1.333 1440
1792 1.37 1308
1888 1.37 1378
1776 1.85 960
1884 1.85 986
1664 2.35 708
2096 2.35 892
2176 2.35 926
1520 2.39 636
1568 2.39 656
1888 2.39 790
1936 2.39 810
688 1.17 588
784 1.17 670
640 1.25 512
720 1.25 576
1184 1.48 800
672 1.5 448
720 1.5 480
800 1.667 480
784 1.75 448
1216 1.9 640
736 2 368
880 2.2 400
768 2.4 320
816 2.55 320
720 2.65 272
640 2.667 240
768 2.667 288
880 2.75 320
1408 2.75 512
752 2.76 272
944 2.76 342
1104 2.76 400
784 3.5 224
896 3.5 256
1008 3.5 288
864 3.6 240
1152 3.6 320
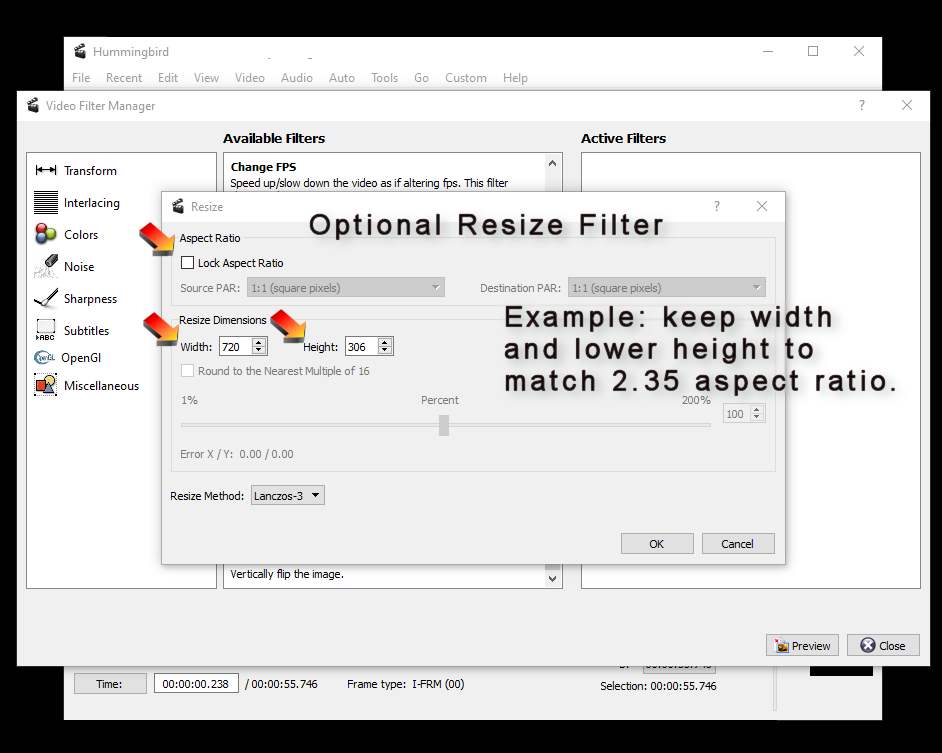
Tip - Change video height to fix the aspect ratio. Changing a DVD's original width of 720 to 880, causes pixels to be rescanned and spread out.
I tested video quality to change an original stretched video from a DVD at 720x362 to 720x306 (height change) and then another copy to 852x362 (width change). Both these end sizes are the same 2.35 aspect ratio.
On playback, I did not see a signifcant difference. A wider width does not give you more detail because there was only 720 pixels worth of detail to start with. Changing the height from 362 to 306 would eliminate and merge some color and detail together, but the smaller picture size would get higher image quality for a fixed video encoding rate.
I would recommend to change the height using the resize filter. Users will playback full screen, anyway. If you keep to the original 720 width, then it only is upsized to full screen once. If you have encoded a wider width, then the upsizing happens twice and that introduces more image artifacts and blurring.
- Pixel Aspect Ratio Calculator:
Steps 7 and 8 do not work for video playback on a website with an HTML5 player. Do not use steps 7 and 8 to create videos for a Media server. You must use step 6, above, instead.
If you use step 6 above, you do not need to do steps 7 and 8.
Steps 7 and 8 create a video that can play back on a computer, phone or tablet player. The video is NOT resized. It only tells the player to take a squashed video and play it back in the right format.
Enter the width, height and Target Ratio in the Pixel Aspect Ratio Calculator below, (a few pages down).
If it's a TV show or movie, you can look up the aspect ratio, at the bottom of the show page on IMDB. You need to join a free membership, to see the movie aspect ratio. - Get the Calculator results:
If you use step 6 above, you do not need to do step 8.
Use Perfect match gold numbers and enter this ratio in:
[Configure] button | Output 1 Tab | Pixel Aspect Ratio - Custom.
AVIDemux can set Aspect Ratio playback in 3 ways:
Option 1 - Force Aspect Ratio
This will make video files with the mkv extension, only. AVIDemux software settings: Output Format | MKV Muxer
You should not use this option to create videos for a Media Server. Use option 3 instead.
You may use this option for copying DVD or VCR videos. This option does not actually resize the video. The player reads what preferred size to use for playback and resizes the video automatically, every time you play it. As long as a player can do this, the video looks fine and you cannot tell that the original size is wrong. This option does NOT remove black bars, nor does it work for playing a video on your own website and may not work for uploading your video to other sites online.
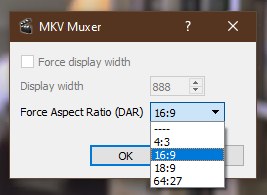

Director: Guy Hamilton - Aspect Ratio 1.66
Option 2 - Force display width or resize the video
For mkv (video file names, that ends in .mkv): Mpeg4 AVC (x264) or HEVC (x265) & Output Format | MKV Muxer. You can remove black bars using this option with a Crop filter.
Force Display Width ONLY works for software video players on computers, phones or tablets.
You should not use this option to create videos for a Media Server. Use option 3 instead.
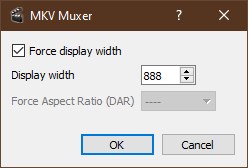
You must crop out black bars. AVIDemux uses Video Input | Filters | Crop | Auto Crop
Input the new cropped video height and the target ratio in the calculator, below, to find the new, Display width. You cannot leave the black bars in the video and then resize the video, because then you would get a very stretched video, plus the black bars.
Width Resize Calculator
You adjust the height and ratio to find a new width. Or you can change the width and find a new height with the Height Resize Calculator, below.
Black Bar Player Demo — The player image black bars update, when you change the Target Pixel Aspect Ratio. You can choose how often the background image changes, get a new random image or even insert an online image link. The buttons, on the right, let you move the image up or down under the black bars. Try Aspect Ratio 2.39 and click the
Video playback — You can also switch from images to video clips from the scroll down list. You can also enter a Youtube image link, at the bottom of the video list to play an online video.
Click the top [Select Images] bar to bring back player images.
1.48, 1.5, 1.66 (super 16mm), 1.75, 1.78 (16:9), 1.85
2, 2.20 (Todd-AO), 2.35, 2.39, 2.40, 2.55, [ 2.59, 2.65
2.66, 2.75, 2.76

|
This chart automatically updates from the height and aspect ratio numbers, above. Excellent matches Good matches
| |||||||||
|
Width and Height from above |
Suggested widths, rounded up, multiples of 16, to work best for video encoding and playback. The resize filter Aspect Ratio from calculator above = ⇨
Reset
|
||||||||
| Display Widths: | |||||||||
| Video Heights: | |||||||||
|
|||||||||
| |||||||||
--- A quality review, comparing video encoding codecs H.264 and H.265 - from xin.at
Why is it hard to play back videos with H.265 codec?
It's because of licensing fees. Videos with HEVC H.265 have higher quality, color, resolution and contrast, but they are a licensed video codec which means the browser companies have to pay, to be able to playback H.265 videos, $0.25 per computer or phone.
Currently, only Safari can play H.265 videos. Don't use H.265 for media servers or for uploading to your own website. You could upload H.265 to Youtube, because Youtube will auto convert the video anyway. It's still better to upload the older H.264 instead, because you don't lose a video generation of quality.
H.265, also named Matroska codec, has very nice contrast sharpness and detail quality, but you can only really use H.265 videos from either your computer, an FTP server or some media servers that allow direct playback like EMBY. To my eye, you can reduce the H.265 .mkv bitrate and file size, by about 25% and still get a comparable, high quality video to the same generation video pulled from the master and converted instead to H.264. Many people say they can go further to 50% smaller file size. That looks edgy to me in my tests. With a mkv type H.265 video, it plays back mostly from just clicking on the filename to open them. You can cast the H.265 .mkv videos to a TV's and it's possible to have the TV find the file from a FTP server, although that can be tricky. Some TV apps do not recognize .mkv files as supported video. Sometimes, you can fix this problem, by renaming the files to .mp4. H.265 also uses AC3 audio and sometimes that is also not supported through TV Apps. You need an app that supports H.265 Video and AC3 audio. Many apps and online browsers just don't support H.265 .mkv files.
H.265 videos is not recommended for Media Players, nor do they play online in a website, except for Safari users. Media players will accept the video, but they all usually convert H.265 to H.264 and then play the video. This can overheat your media server, especially if you don't pay for a full license, because the converted videos are not saved and so you run a new conversion, every time you play the video. Conversion doesn't have licensing fees, but playing directly does... Did you notice, I did warn you above, that this whole video conversion thing is comically complex?
Some people actually prefer the smooth, softer look of of the older H.264. There are also, other, new, free video types, that skip over HEVC H.265 (see option 3).
Video Output - Tips and Tricks
H.265 videos are better quality than H.264. But H.265 videos are only good for clicking the filename to play them back. H.265 videos don't work on websites and are not recommended for Media Servers.
Use H.264 video and AAC (FDK) audio for online playback and Media servers.
Encoding settings, I like, are:
Option 3 - Pixel Aspect Ratio - Custom
This option is most useful to make MP4v2 videos with AAC (FDK) audio, because that video format works for Web playback on your own website with HTML5. This also is the preferred format for uploading to Youtube.
Before we go any further, you need to know what is up, with the different video types and online playback.
Other video types
You can make HD and 4K - AVC H.264 videos with AVIDemux software for playback from a website. You need a different video encoder to make Webm VP9 or Webm AV1 videos, which have smaller file sizes, startup faster and stream smoother online, but work best for users with newer computers and phones that can handle these videos.
Why option 3, steps 1 - 6 is best, to create a library of videos
Option 3 makes a video MP4v2 resized to the correct aspect ratio and with audio AAC (FKD). This is the audio / video combined file type that can play in all browsers, without having to reencode.
Local Media servers mostly prefer all content to be Mpeg4 AVC x264 .mp4 files with AAC (FDK) audio only and already be saved as the correct Pixel Aspect size. Option 3, steps 1 through 6, makes this type of video to use for media servers and for export to Youtube and other online playback sites or to add video to your own website directly.
Why does the video type HEVC H.265, not work for browser playback? (Safari and older Edge browser version handle HEVC). The answer is licensing costs. The company making the browser has to pay and it's too expensive to use HEVC. Since only a couple of browsers can handle it, media server software just automatically converts all HEVC H.265 video into Mpeg4 AVC H.264. Media servers are setup to pull content from incoming live broadcasts. The Media server works like a DVR. Content, you otherwise get from online, is already set to play correctly in browsers and is Mpeg4 AVC H.264, anyway.
What happens if you try to upload an HEVC H.265 video? Youtube, Facebook, Instagram, Viemo and other online sites accept the video. They convert it anyway for their online playback. You will run into trouble if your video has not been pixel resized to the correct aspect ratio. Using Forced Aspect ratio in Option 1 or Forced Display Width in option 2 will probably not work and cause your uploaded video to play back squished or stretched online. You should run the Resize filter to make a new video copy with the correct aspect ratio, before sending any video to a social media site.
What about an HEVC H.265 video on your own website, using a browser embedded software player like jplayer or video.js? Video will not playback or at most will play without audio. It may playback correctly on the latest Safari and older versions of the Microsoft Edge browser. It has been pulled from the new version, probably due to licensing costs.
Media server playback runs into a serious problem with HEVC H.265 videos, because it needs to reencode the video, on the fly, in order to play back for all browsers. If your video collection are HEVC H.265 .mkv files that you created using options 1 or 2, above. The Media server needs to be setup to convert and store a video copy in the older Mpeg4 AVC H.264 codec. But this only works with the paid, premier copy of media server software. The free version of the media server never stores a Mpeg4 AVC H.264 video copy but converts, on the fly, every time and causes the CPU use to skyrocket and potentially overheat for every HEVC x265 video it plays. A properly configued media server can have a hardware encoder (about $300), which would solve this problem. Or, you just use option 3, steps 1 through 6, to convert all videos to Mpeg4 AVC X264 and Audio AAC (FDK) and resize the video to it's correct aspect ratio. This gives you a video copy that plays back on all browsers with all media servers and is exactly what Youtube or Vimeo prefer. Then you never run into the reencoding problem, on the fly, or workstation overheating.
Option 3 setup
You must crop DVD's and VHS videos to remove all black bars, before adjusting the aspect ratio.
Video Output:
Audio Output:
Output Format Muxer:
__________________________________
Steps


Where the heck did these ratio numbers come from?
Do you really want to know? The Output 1 tab setting for Pixel Aspect Ratio - Custom is the fraction needed to multiply the current video width, (720 for DVD), to get the correct video width, for an Aspect Ratio, based on the video height. If that makes sense, congratulations. I am confused, just writing it down. You are not entering the ratio you want the video to become. Instead, you are entering the fraction you need to change the video from it's current width to the correct width, you want.
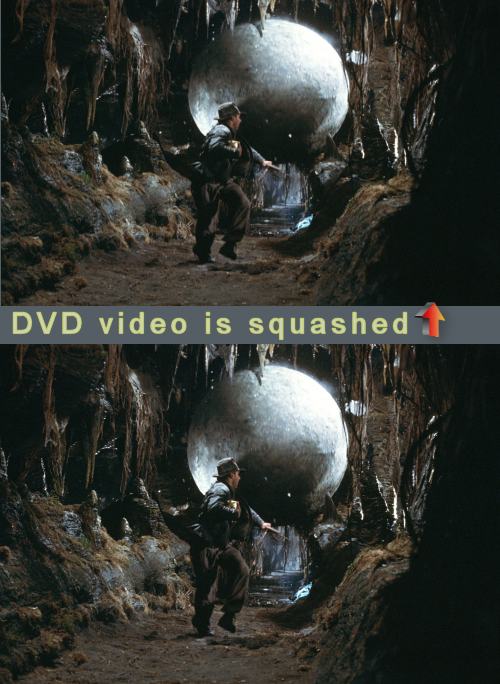
It's all squashed: DVD and VHS content is actually squashed. Shocking, I know. Unless you're a video editor, you probably don't know this. Widescreen TV's and DVD player software in computers and the rare TV tuner USB or PCI card for computer, all automatically fix the video height. But, if you plug a DVD or VCR, directly into a computer monitor, the playback will be squashed 10%.
Fix the squish: AVIDemux imports DVD's as squashed video. The easiest fix is to force 4:3, but that keeps all black bars - option #1 above. The nicer way is to first crop out all black bars, so only the video remains. Then the video either needs to play back default as a 4:3 format, 1.333, or the correct widescreen movie ratio. Most common are 1.85, 2.35 and 2.39. Since you have a video with all black bars removed, you just need to look up the original aspect ratio and then set the correct video width to make it playback like the original TV show or movie. Any squishing that happened on the DVD is no longer important. The black bar removal can be done with either option #2 or #3. You need option #3 if you want video content, that can play back with HTML5 player, on your own website or for upload to YouTube. Also use option #3 if you want to create videos for a Media Server, which converts always to the AVC H.264 video codec before it plays back anything. Option #3 will keep your media server from overheating. When you save videos in the AVC H.264 codec, the media server can just play the video and not have to covert and play at the same time.
Leave the black bars, I can live with them: If you leave the black bars alone, forcing 4:3 usually fixes both DVD and VHS content. Forcing 16:9, sometimes helps with older DVD widescreen movies. DVD content is 720 x 486, but this video only looks correct on a computer, playing back 720 x 540. (TV playback squash math is 540 * 0.9 = 486). Remember, these videos are set to playback on a standard TV which auto stretches the image, vertically . Both DVD and VHS tapes put widescreen movies inside this 4:3 format with added black bars, top and bottom. Forcing the video aspect ratio back to 4:3, 720 x 540 for DVD's and 640 x 480 for VHS tapes, will return the video content to the right look with the black bars.
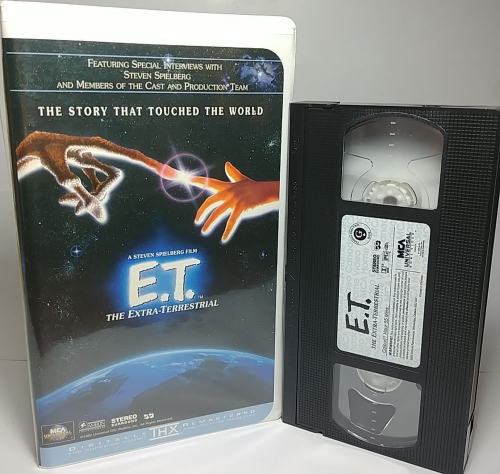
VHS tapes - old style: VHS tapes record video 320 x 240 with two video frames added together of alternating horizontal lines (interlaced). In order to digitize a VHS video, you need a computer video capture card or USB converter, which will automatically brings the video into the computer at 640 x 480, which is the 4:3 aspect ratio. Even if you run across a video where someone messed up the conversion and the video is squashed, you can still fix it, by using option #2 or option #3. Both these options can also fix any black bars.
Interlaced - What to do?
VHS tapes play interlaced video, which is a little like dealing with angry bees. It's often better to just leave them alone. When you capture the VHS video at 640 x 480 and look closely, you will see jagged lines on anything that moves left and right. Good ole, standard TV's soften this up, partly from the cathod ray design and a latent image. On a computer monitor, it's easy to see these artifacts and they can get much worse if you try to resize the video. It can even look like a 60's special effect where the edges of everything is waving about, like things were just hit with an Outer Limits ray gun. AVIDemux has some interlace filters to help remove jagged lines, blur the edges, combine frames together and smooth out fast motion. They do a nice job, but it's never perfect.

Interlaced vs. progressive frames - IBM Cloud Watson Media
A trick to remove interlaced lines and other junk: This can fix three problems at once: interlaced lines, combed images and field reversals caused by editors who don't know what they are doing. The downsides are: the video becomes half the size and even though fast movement looks cleaner, it can be a little choppy, but then, hardly noticeable, with the half size video. Try it out by setting the video capture from the VHS tape to exactly 320 width by 240 height.
You can only crop any top and bottom black bars, after this first size reduction, not before. It's easier to just leave the top and bottom black bars in the video. Otherwise, you lose a generation by encoding twice. If you really want to get rid of top and bottom black bars, then make the first encoding that drops the size to 320 x 270 as high quality, as possible, uncompressed, if you can. Then crop the black bars and compress the video, as needed, in a second encoding.
With a DVD copy of a TV show in standard 4:3 format (not widescreen), crop out any left and right black bars and set the cropped video to resize at 320 by 240, as well.
Your new copies should be completly free of interlacing, combed transition images and any field reversal errors. Playback will look very nice on smaller computer monitors, in an embedded browser window or on a phone... More details on these artifacts from dvcreators.
AVIDemux can crop height and width. You can also resize the video to get rid of squashed or stretched aspect ratio. This is done with the Resize filter, details in option 2 or option 3 step 6, which is the only option that works for video playback with HTML5 on your website.
Video players allow a first open size, with a wider width and play a video in say, an 880 pixel width, when the video is really only 720 pixels wide. Phones and computers can do this.
Professionally made, higher res, video copies are not sized up, but rather made from an HD master that starts at 1920 x 1080 pixels. Downsizing from HD would be 1280 x 720, or 720 x 480. These sizes are the 1080, 720, 480, you see in Youtube.
Step 8 - is pretty tricky. If you have done Step 6, you do not need to do this step.
Do not use this step if you want to play the video back, online.
Do not use this step if you are saving videos for a Media server.
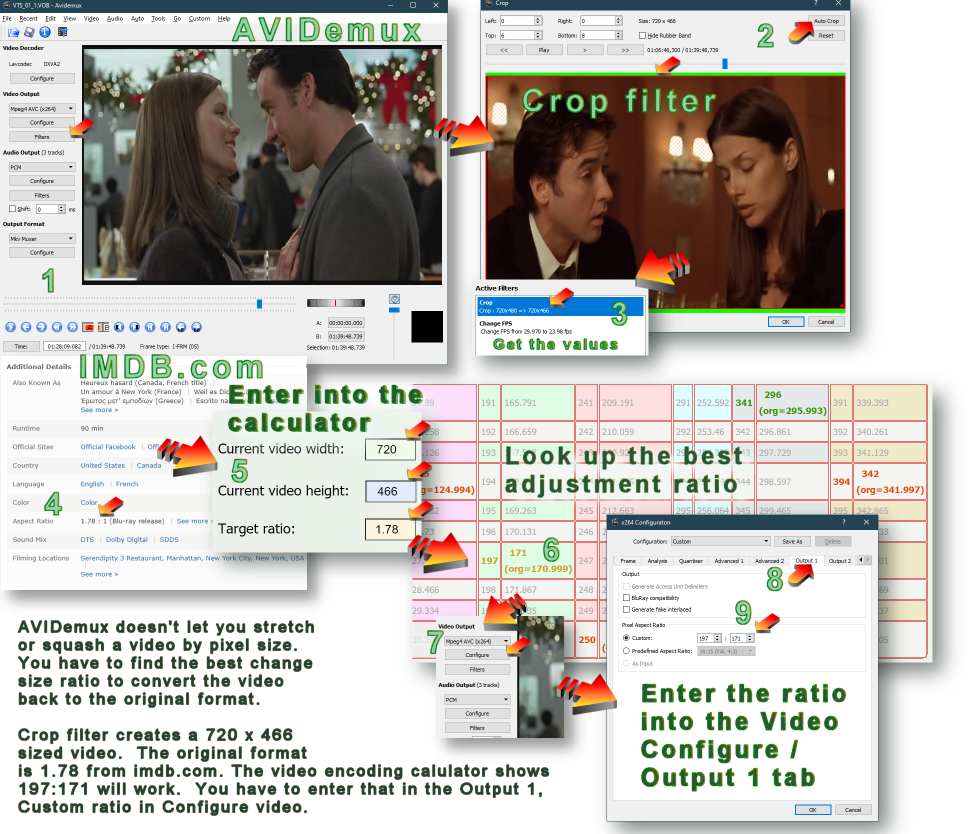
If you're lucky, removing the black bars will bring the video back to it's original aspect ratio and the calculator will show that 1:1 works and no resizing is needed. This doesn't work with DVD 720 width or old VCR 640 width videos, unless someone already fixed the video size. If it looks squashed or stretched, you can use this calculator with AVIDemux, to fix it.
A tip to get the Crop Filter exactly right, is to click the 'Hide Rubber Band' check box. Then you can use the Top / Bottom, Left / Right numbers to get a perfect crop.
--- Aspect Ratio history - Wikipedia
--- [Video] SFX Secrets: Aspect Ratios
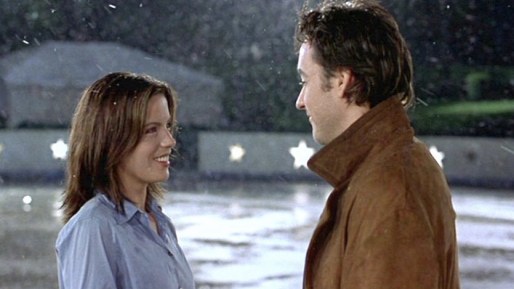
Tip: It's good practice to leave the width alone, if possible, unless you are cropping out black bars, 8 pixels, or wider. Video encoding divides the screen into 8x8 and 16x16 pixel macroblocks. A 720 x 480 DVD video size has exactly 45 by 30 of these 16x16 sized pixel macroblocks and not a pixel left over.
If you crop out thin vertical black bars to a new width, of say, 716, then encoding has to process differently a whole column of 12x16 macroblocks.
The screen pixel sizes for TV's, DVD's, blu-ray's, HD online video content and even computer screens and phones, are all divisible by 16 and this helps video playback look better, playback more smoothly and with more definition for full screen playback.
You may wish to find the best, even numbered width and height for a pixel ratio. Encoders jump to even numbers, so picking odd numbers could make a full screen playback wrong by 12 pixels. Put the movie on a big TV and it could be squashed by 1/2 inch, or a stack of eight quarters. I can easily see that from across the room.
The Width calculator above, has a table that lets you find best even pixel size matches for each aspect ratio.
Pixel Aspect Ratio Calculator
Use this table to force a video size for 3rd party app playback. (VLC) This will not work for video playback online or from a media server.
This is for steps 7 and 8, above, only. Do not use for any other task.
pixels (after cropping out of black bars)
Ratios: (full screen 4:3 = 1.333, TV HD 16:9 = 1.778)
Other film & camera ratios: 1.17, 1.25, 1.33 (4:3), 1.37 (academy ratio)
1.48, 1.5, 1.66 (super 16mm), 1.75, 1.78 (16:9), 1.85
2, 2.20 (Todd-AO), 2.35, 2.39, 2.40, 2.55, [ 2.59, 2.65
2.66, 2.75, 2.76
--- Widescreen.org
--- Resolution/Aspect Ratio Cheat sheet
Near match ratio within 0.004
Good match ratio within 0.007
Okay match ratio within 0.01
Results
| Encoding ratios for AVIDemux to fix squashed or stretched videos. Set these W and H values and use Video Output - Mpeg4 AVC x264 - Configure button | Output 1 tab Only Mpeg4 AVC (x264) will work. | |
|---|---|
|
Perfect: (accuracy <= 1 pixel per 1000) DVD video height is exact. Increase Test Range for W, if no ratios are showing here. |
Near: (accuracy <= 1 pixel per 250) DVD video height error 1 to 2 pixels. |
|
Good: (accuracy <= 1 pixel per 143) DVD video height error 2 to 3 pixels. |
OK: (accuracy <= 1 pixel per 100) DVD video height error 3 to 5 pixels |
| Encoding ratios chart: W = 1 to 400 | |||||||||||||||
|---|---|---|---|---|---|---|---|---|---|---|---|---|---|---|---|
| W | H | W | H | W | H | W | H | W | H | W | H | W | H | W | H |
| 1 | 51 | 101 | 151 | 201 | 251 | 301 | 351 | ||||||||
| 2 | 52 | 102 | 152 | 202 | 252 | 302 | 352 | ||||||||
| 3 | 53 | 103 | 153 | 203 | 253 | 303 | 353 | ||||||||
| 4 | 54 | 104 | 154 | 204 | 254 | 304 | 354 | ||||||||
| 5 | 55 | 105 | 155 | 205 | 255 | 305 | 355 | ||||||||
| 6 | 56 | 106 | 156 | 206 | 256 | 306 | 356 | ||||||||
| 7 | 57 | 107 | 157 | 207 | 257 | 307 | 357 | ||||||||
| 8 | 58 | 108 | 158 | 208 | 258 | 308 | 358 | ||||||||
| 9 | 59 | 109 | 159 | 209 | 259 | 309 | 359 | ||||||||
| 10 | 60 | 110 | 160 | 210 | 260 | 310 | 360 | ||||||||
| 11 | 61 | 111 | 161 | 211 | 261 | 311 | 361 | ||||||||
| 12 | 62 | 112 | 162 | 212 | 262 | 312 | 362 | ||||||||
| 13 | 63 | 113 | 163 | 213 | 263 | 313 | 363 | ||||||||
| 14 | 64 | 114 | 164 | 214 | 264 | 314 | 364 | ||||||||
| 15 | 65 | 115 | 165 | 215 | 265 | 315 | 365 | ||||||||
| 16 | 66 | 116 | 166 | 216 | 266 | 316 | 366 | ||||||||
| 17 | 67 | 117 | 167 | 217 | 267 | 317 | 367 | ||||||||
| 18 | 68 | 118 | 168 | 218 | 268 | 318 | 368 | ||||||||
| 19 | 69 | 119 | 169 | 219 | 269 | 319 | 369 | ||||||||
| 20 | 70 | 120 | 170 | 220 | 270 | 320 | 370 | ||||||||
| 21 | 71 | 121 | 171 | 221 | 271 | 321 | 371 | ||||||||
| 22 | 72 | 122 | 172 | 222 | 272 | 322 | 372 | ||||||||
| 23 | 73 | 123 | 173 | 223 | 273 | 323 | 373 | ||||||||
| 24 | 74 | 124 | 174 | 224 | 274 | 324 | 374 | ||||||||
| 25 | 75 | 125 | 175 | 225 | 275 | 325 | 375 | ||||||||
| 26 | 76 | 126 | 176 | 226 | 276 | 326 | 376 | ||||||||
| 27 | 77 | 127 | 177 | 227 | 277 | 327 | 377 | ||||||||
| 28 | 78 | 128 | 178 | 228 | 278 | 328 | 378 | ||||||||
| 29 | 79 | 129 | 179 | 229 | 279 | 329 | 379 | ||||||||
| 30 | 80 | 130 | 180 | 230 | 280 | 330 | 380 | ||||||||
| 31 | 81 | 131 | 181 | 231 | 281 | 331 | 381 | ||||||||
| 32 | 82 | 132 | 182 | 232 | 282 | 332 | 382 | ||||||||
| 33 | 83 | 133 | 183 | 233 | 283 | 333 | 383 | ||||||||
| 34 | 84 | 134 | 184 | 234 | 284 | 334 | 384 | ||||||||
| 35 | 85 | 135 | 185 | 235 | 285 | 335 | 385 | ||||||||
| 36 | 86 | 136 | 186 | 236 | 286 | 336 | 386 | ||||||||
| 37 | 87 | 137 | 187 | 237 | 287 | 337 | 387 | ||||||||
| 38 | 88 | 138 | 188 | 238 | 288 | 338 | 388 | ||||||||
| 39 | 89 | 139 | 189 | 239 | 289 | 339 | 389 | ||||||||
| 40 | 90 | 140 | 190 | 240 | 290 | 340 | 390 | ||||||||
| 41 | 91 | 141 | 191 | 241 | 291 | 341 | 391 | ||||||||
| 42 | 92 | 142 | 192 | 242 | 292 | 342 | 392 | ||||||||
| 43 | 93 | 143 | 193 | 243 | 293 | 343 | 393 | ||||||||
| 44 | 94 | 144 | 194 | 244 | 294 | 344 | 394 | ||||||||
| 45 | 95 | 145 | 195 | 245 | 295 | 345 | 395 | ||||||||
| 46 | 96 | 146 | 196 | 246 | 296 | 346 | 396 | ||||||||
| 47 | 97 | 147 | 197 | 247 | 297 | 347 | 397 | ||||||||
| 48 | 98 | 148 | 198 | 248 | 298 | 348 | 398 | ||||||||
| 49 | 99 | 149 | 199 | 249 | 299 | 349 | 399 | ||||||||
| 50 | 100 | 150 | 200 | 250 | 300 | 350 | 400 | ||||||||
